
If you want to export emails from Windows Live Mail to Outlook then download Yota Windows Live Mail Converter for free.
Windows Live Mail (WLM) is a free software e-mail client that Microsoft has stopped providing. WLM is the successor of Windows Mail (Windows Vista) and the successor of Outlook Express (Windows XP and Windows 98). WLM is compatible with Windows 7, Windows 8 and Windows 10. As of 2012, WLM no longer supports Windows Live Mail. Although Microsoft has added a new email client (Windows Mail) to the Windows 10 version, different users continue to use Windows Live Mail for different reasons. But now, many users have or plan to switch to Microsoft Outlook, because it makes no sense to keep WLM next to MS Outlook.
Therefore, if you plan to export Windows Live Mail to Outlook, then you may find this article worth reading.
Here are some ways to export Windows Live Mail to Outlook on another computer:
Export using Windows Live Mail
File location from Windows Live Mail
The core of the EML to PST converter tool
Instant solution
Download the automatic email migration tool for EML to PST to export emails from Windows Live Mail to Outlook on another computer without risk of data loss.
Method 1 export using Windows Live Mail
Windows Live Mail has an export function, which can export WLM mail items directly to Microsoft Exchange or MS WLM format. The detailed steps for exporting items to MS Exchange are described below.
Start the Windows Live Mail email client, and click File>Export Email>Email. Start the Windows Live Mail email client
Select the Microsoft Exchange option and click Next. Select the Microsoft Exchange option
Then you will see the following export message, press OK to continue
Select "Outlook" from the "Profile Name" drop-down menu, and then press "OK". Select Outlook in the profile name
In the "Export Mail" dialog box, select "All Folders" or "Selected Folders" and click "OK" to continue.
Select "All Folders" or "Selected Folders" option
A new dialog box shows the status of the export process Windows live mail export process
Finally, you will receive a new message confirming that the export process has been successfully completed.
Open Outlook to verify the export.
Since you have now exported all WLM mail items to Exchange, you can easily download these mails as PST files to the storage device of your choice. You can use the "Import/Export" function of the Outlook desktop client to quickly complete this operation.
Note: It is recommended that when exporting Windows Live Mail to Outlook, make sure that there is no active Outlook instance running. It was found that running WLM and Outlook at the same time would hinder WLM's ability to export emails to MS Exchange.
Method 2 from Windows Live Mail file location
You can also use a storage device to transfer WLM files stored in the system in ELM format. If you plan to move the WLM EML file to a new PC, after configuring the Outlook desktop client on the new system, you can drag and drop the EML file to the newly created folder in the Outlook client. To do this, please follow the steps below:
Generally, WLM files are located in the following locations on the system:
C:\Users\[user name]\AppData\Local\Microsoft\Windows Live Mail
This location contains several folders with mailbox information. Copy these files to the storage device.
Now, connect your storage device to the new system.
Start the Outlook client and add a new folder (name similar to WLM).
Just drag and drop all the files into this folder. Drag all files and folders
Method #3 for EML to PST
It makes sense for Windows Live Mail items to be stored on the system in EML format. As shown earlier in method 1, WLM has a built-in function to export emails to MS Exchange, but it does not keep any hierarchy. In addition, Method 1 requires the knowledge of two email clients and data is likely to be lost. As we've already seen, move on to Method 2, which is completely manual. Emails have to be manually transferred and dragged to the newly formed Outlook folder. Hence, it can be said to be time consuming and high risk of data loss. Hence, it is recommended to use professional third-party tools. An effective tool is Yota EML to PST converter. The tool will automatically display all EML files from the PC. The final product is a single PST file containing WLM mailbox items. Hence, it is easy to transfer emails to another PC. In addition, it retains the original structure, format and characteristics of mailbox items. It even makes it possible to export the converted EML directly to the can-based Office365. This is how it works:
Run EML to PST. The left panel shows the hierarchy of folders on the system. You can manually find the folder containing the EML files, or you can use the "Search" option to scan for EML files on the local drive.
Scroll to specify the source drive to locate the EML folder. Search the EML folder
Select the source folder / drive and click OK. Select source folder / drive
Once all folders containing EML files are displayed, select the desired folder and click the "OK" button. The EML content is displayed on the right panel. Click on the Save button. Select the required EML file
In the next window you can use the rule "Define conversion" to save specific data in the selected folder. If not necessary, the option "Convert all items" is set by default. Click Next. Choose to convert all items
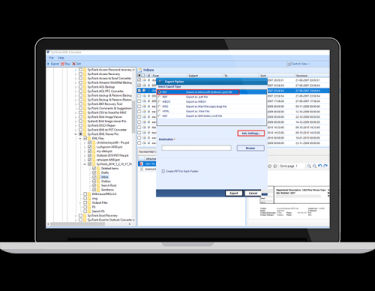
In the Select Destination window, you can specify a destination path to save the converted PST. You can choose different options to save data:
If you want to create a new PST, click the radio button "Create a new PST".
If you want to save the converted data in some existing PST files, click on the radio button "Save in existing PST file".
Select the desired save options, specify the destination path and click the "Save" button.
Note: If necessary, you can choose "Save to Folder Hierarchy".
Select target window
The converted PST file has been successfully saved in the specified location. Click OK to complete the conversion process. Save the converted PST file
Conclusion
In this article, we have discussed different methods to export emails from Windows Live Mail to Outlook on another computer. The first two methods are time consuming and have a high potential for errors. The latter method is fully automated and can save users a lot of time. Hence, we highly recommend exporting the EML core PST tool from Windows Live Mail to the Outlook desktop client.


 14175
14175

*********dhuri@gmail.com
Download ZOOK EML to PST Converter to multiple export EML files into PST format. The tool can easily convert EML files into PST format to save EML data into PST format. . The tool will quickly convert EML files into PST format by preserving the data integrity and other email formatting such as header, subject, to, bcc, sender and receivers information, etc. It is a Windows based utility which can be smoothly works on any version of Windows operating system i.e. Windows 10, 8.1, 8, 7, and all below editions.The utility has also demo edition which offers to export 25 items of EML files to PST format in few moments. Explore More:- https://www.zooksoftware.com/eml-to-pst/