
In this article, we have discussed the best method to import OST and PST files in the Office 365 account.
Office 365 or Microsoft 365 is one of the leading email clients that offer a variety of services. It gives world-class security and cloud services. It provides you to use a whole lot of productive Office apps from any device. Although it provides great flexibility, there is an arising need to import OST and PST files into Office 365. OST and PST files are Exchange server file formats that store all the mailbox data in them. In this blog, we will discuss the methods to import OST and PST into Office 365.
Reasons to Import OST and PST into Office 365
There are a number of reasons for which users want to import OST and PST into Office 365. Some of these reasons are mentioned below.
- Office 365 users can access their data at any location and device on the cloud.
- The downtime experienced by the exchange server can be avoided.
- To migrate to Office 365 due to Organisational needs or shifts.
- To prevent accidental deletion of data from the server.
Remember: However, there are no direct methods to import OST files into Office365. We can find a way by converting OST files to PST and then importing PST files into Office 365. First, let us discuss the steps to convert OST to PST. The methods for this process are mentioned below.
Know-How to Convert OST to PST
Below are the ways that can be used for converting OST files to PST file formats.
- By Using MS Outlook Export Feature
- By Using MS Outlook Archive Feature
- By Copying OST Items in New PST File
#1. By Using MS Outlook Export Feature
You can convert OST to PST files by using the Export feature of MS Outlook.
Step 1: Open the MS Outlook application on your Windows-based system.
Step 2: Click on the File tab at the top left corner of the screen.

Step 3: Now, click on Open & Export, and under that choose Import/Export.

Step 4: After that, from the options choose Export to a file and click on Next.

Step 5: Mark on Outlook Data file (.pst) and click on Next.

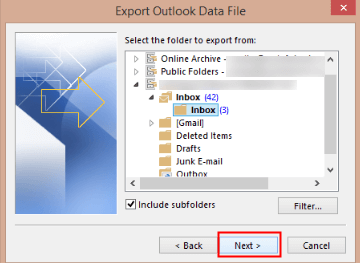
Step 6: Select the folder that you want to convert to pst and click on Next.
Step 7: From the given options, check on replace duplicates with items exported and Click on Finish. Your OST file will be converted to a new PST file, and you can upload OST to Office 365.

#2. By Using MS Outlook Archive Feature
OST files can be converted to PST files by using the MS Outlook Archive feature.
Step 1: Open the MS Outlook application on your Windows-based system.
Step 2: Click on the File tab at the top left corner of the screen.
Step 3: Now, under Info, click on Tools, and from the drop-down menu, Select Set Archive Folder.

Step 4: After that, choose the folder that you want to convert and click on OK. It will convert an OST file to a PST file.

#3. By Copying OST Items in New PST File
You can convert OST to PST files easily by copying the OST items into a PST file.
Step 1: Open the MS Outlook application on your Windows-based system.

Step 2: Click on the Home tab at the top left corner of the screen.
Step 3: Now, under New Items, click on More items and Select Outlook data file. Here, a new PST file will create.

Step 4: Choose the emails that you want to convert, right-click on them and click on Move.
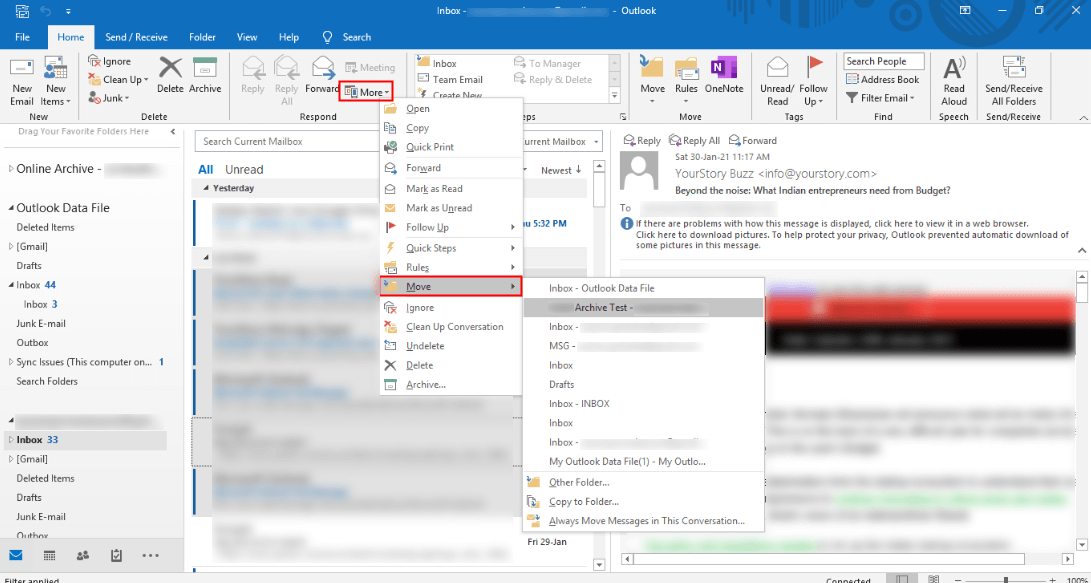
Step 5: After that, select the folder in which you want to move your data. Here, a new PST file will create including all the data.
Here, You have converted your OST files to PST file formats. Now, let us move to the second step to import OST and PST files into Office 365.
Methods to Import PST Files to Office 365
As you have converted your OST files to PST file format, Now Import PST files to Office 365 using the below-mentioned solutions.
- By Using Azure AzCopy
- By Drive Shipping PST files to Office 365
#1. By Using Azure AzCopy
Azure AzCopy is a command-line utility provided by Microsoft. It can be used to copy files or blobs to or from a storage account. Here, we will use Microsoft Azure AzCopy to import OST and PST files into Office 365.
Step 1: Sign in to your Office 365 account and go to Admin Center of Exchange Server.
Step 2: The Exchange Admin Center (EMC) window will appear. Select Permissions and then double click on Organization Management.
Step 3: Click the ‘+’ sign in the new tab and choose Mailbox Import Export.
Step 4: Now, click on the Add button and select OK.
Step 5: After that, select Mailbox Import/Export again and click on Save.
Step 6: Go to Admin Center and select the Setup followed by Data Migration. Click on Upload file.
Step 7: Click on New Import Job and write a job name. Then, hit the Next button.
Step 8: Mark on Upload your Date and click on Next.
Step 9: Then, select the option Show Network Upload SAS URL.
Step 10: Now, copy the URL and paste it on Notepad.
Step 11: Download and Install Azure AzCopy from the Microsoft site.
Step 12: Open the Azure AzCopy tool and type, ‘AzCopy.exe /Source: \Network Path or File location /Dest:” SAS URL”/V: location path where you want to save logfile /AzCopy.log /Y’
Step 13: Press Enter to create the PST file.
Step 14: Now, you have to create a CSV file to map the PST file into the mailbox account.
Step 15: After that, Open the Import data tab and mark on both options. Then, click on Next.
Step 16: Under Mapping File, Click on Upload CSV file.
Step 17: At last, Click on Validate and then Save.
By following this method, you can upload PST to Office 365. But this method can be quite complicated for novice users to execute.
If you fail to do so, you can opt for the below-methods to import OST and PST files into Office 365.
#2. By Drive Shipping PST files to Office 365
This method to import PST to Office 365 is the easiest method. You just need to copy your PST format files into a hard disk drive and ship them to Microsoft. A Microsoft official will copy and upload your files to your Office 365 account.
Both the methods mentioned above can import PST files to Office 365. But they are very time-consuming and need technical knowledge. The drive shipping method could take around ten days to get your PST files imported into Office 365. You can go with other solutions (Office 365 Converter) to overcome these constraints. This tool can directly Import OST and PST Files into Office 365 without even converting them to PST.
Conclusion
Here, I have discussed the need to import OST and PST files into Office 365. Additionally, I have mentioned the solutions for the same. Using these methods, you can easily import OST and PST into Office 365. These methods are time-consuming and can be difficult for a novice user to execute. A third-party tool is an alternate method to Import OST and PST to Office 365 through which you can directly import these files with ease. Thank you for reading this blog. I hope it will be helpful for you.


 1587347