
Learn how to migrate G Suite docs to Office 365 with/without mailbox items such as emails, contacts, calendars. Move docs, slides, sheets, into O365 easily.
" title="YouTube video player" frameborder="0" allow="accelerometer; autoplay; clipboard-write; encrypted-media; gyroscope; picture-in-picture; web-share" referrerpolicy="strict-origin-when-cross-origin" allowfullscreen>
The article describes the method to migrate G Suite docs to Office 365. You can also move sheets, slides, and drawings along with docs if required. Anyhow, you will know how to migrate docs from a single G Suite account to Office 365 as well as transferring documents from multiple users accounts at once. So let’s get started.
Two Methods to Migrate G Suite Docs to Office 365
We will explain two different methods to do this. The manual method needs the user to implement all the steps manually, so it may take you a while to complete the process. But it is also a free method. Keep in mind that the manual method is applicable for moving data from a single account to another. The automated solution does not need much manual intervention, but it is also not a free solution. You can use this method to move Google drive documents to OneDrive application. Also, this method is applicable to moving items from multiple user accounts at once.
The two methods are as follows:
- Manual Method
- Automated Method
Manual Method to Perform G Suite Docs to Office 365 Migration
Get the step by step manual method with screenshots in the following section:
Stage 1: Sign in to G Suite
- First, sign in to the G Suite user account on the web browser.
- Once logged into your account successfully, go to Apps, and select the Drive option to open it.
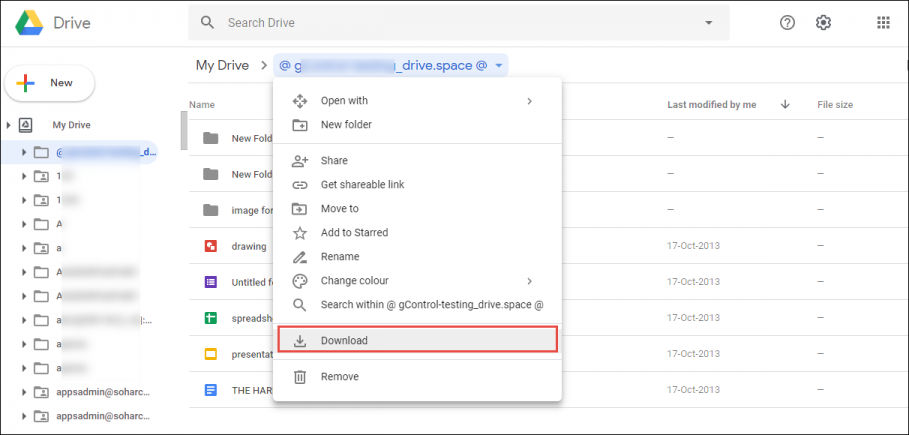
Stage 2: Download the Documents
- Now, choose the documents from Google Drive and right-click to select the Download option.
- Once you click on the Download button, Google will compress the file(s) into a Zip file.
- Once prepared, all the documents will be downloaded as a Zip file format in the web browser.
Stage 3: Extract Files
- Download all the documents on the computer in a ZIP file. Extract the documents from the ZIP file on your computer by right-clicking the file and select the Extract Files option.
- All the docs are on your system.
Stage 4: Migrate Docs to Microsoft Office 365 OneDrive
- To migrate G Suite docs to Office 365, you will need to sign-in to the Office 365 account and open the OneDrive application.
- Finally, click on the Upload option and browse the documents to upload them to your OneDrive section.
This way you can easily move all the documents, sheets, slides, images that reside in your G Suite account to the Microsoft 365 account.
Transfer Mailbox Items Multiple G Suite User Accounts to Office 365
The manual method is good for migrating data from 4-5 G Suite accounts. But it becomes a painful experience if the migration involves a majority of G Suite users. Since, it is impossible to process and transfer docs, sheets, items, etc. from multiple accounts at once.
To do this, refer to the professional solution in G Suite to Office 365 migration step by step guide. This professional solution, SysTools G Suite to Office 365 tool allows the administrator to migrate G Suite docs to Office 365 account. It also moves emails, contacts, calendars to the MS Office 365 account.
Anyhow, regarding the docs, the software also provides date-range filters while migrating the mailbox items. It also moves the document permissions along with the actual files.
The GUI of the software is easy to understand and the native Help sections contain all the steps, prerequisites, and other additional information, a user will ever need for the migration. This software is available for both Windows and Linux OS.
Note – The tool requires Admin authority for both G Suite and Office 365. It can move emails, contacts, calendars, and documents to Microsoft 365 account. The permissions are also carried over to the O365 account. The features also include delta migration, category selection, which makes it a remarkable application.
The Working of the Software is:
- Download and activate the application on your computer system.
- Select G Suite and Office 365 as the Source and Destination respectively.
- Make sure to mark the Documents option and apply filters and other settings as per your requirements. You can also choose the other mailbox items to migrate.
- In the Source tab, choose the G Suite admin email, service account, and p12 file, click the Validate option.
- In the Destination tab, choose the Office 365 email and app id, click the Validate option.
- Choose the option to fetch the user accounts to migrate the data from.
- The software will validate the user accounts and click Start Migration to start the migration process.
Conclusion
There are a lot of situations where a user wants to migrate G Suite docs to Office 365. Therefore, we described a manual method to help move the files without any hassle. But it is only able to transfer data from one G Suite account at a time. So, when trying to move data items from multiple G Suite accounts collectively, the manual method is not enough. For those users, we also described a professional guide that contains the software to move items from multiple G Suite accounts at once. The items can be emails, contacts, calendars, documents, slides, drawings, sheets. So, choose whatever method you want.


 3901
3901