
Netgear is well known for its performing devices in the market. It comes with the best features to boost your Wi-Fi speed and provides a larger coverage area. You no longer have to worry about the dead spots and weak signals around your house
What are the simple steps to do the Netgear Extender Setup?
Netgear is well known for its performing devices in the market. It comes with the best features to boost your Wi-Fi speed and provides a larger coverage area. You no longer have to worry about the dead spots and weak signals around your house. Not only you get the best features you can easily do the Netgear setup without wasting your time and energy. You will be easily able to access your device once you are done with the Netgear wifi extender login page. Here, you will know more about the extender setup process and how you can update the firmware of your Netgear device.
Easy Steps for the Netgear Extender Setup
If you wish to know some simple and easy steps to do the Netgear setup, you are at the right place. For that, you have to check out the instructions given below.
1. For the initial, you have to plug in your extender to the power source and then turn the power button on.
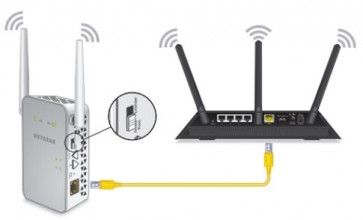
2. Then connect your computer to your extender using an Ethernet cable and then connect it to your router.
3. Now open any browser on your computer and then enter mywifiext.net in the URL field and hit the enter key.
4. You will go to the login page and there you have to enter the default username and password as admin and then tap on the login button.
5. Once you are logged in, you have to click Yes when asked for Netgear Genie help.
6. Choose the SSID name by clicking on the radio button and click on the Next button.
7. Now, follow the instructions on the screen to complete the process.
How to update the Netgear Wireless extender?
You might face a performance issue with your Netgear extender device that might be due to an old version of the firmware. You can easily update your device’s firmware with the steps provided below.
• First, you have to download the latest version of firmware from the support website
• Then, unzip the file and save it.
• Now open the login page using mywifiext.net web address.
• On the login page enter the login credentials to go to the setup page.
• Then, go to the settings and then to the firmware Update.
• Choose the Maintenance and then tap on Firmware update.
• Browser the downloaded file and open it.
• Click on the update button and wait for the update to complete.
Guidelines for Netgear Wi-Fi Extender Setup
Netgear is popular for its high-tech services and high-performing devices. If you are struggling with slow internet speed and dead spots, Netgear is the best solution to all of your internet-related problems. You will get all the advanced features to make it easy to access and provide you better comfort. You can easily do the Netgear setup with the help of smart technology. Here, you will get the more detailed information regarding your Netgear wifi extender setup and reset process. You will be able to update the device’s firmware easily.
Guided instructions for Netgear Setup and Login
If you are searching for some easy and simple steps for the Netgear setup, you are at the right place. You can check out the easy setup steps below and proceed with the setup process.
1. Plugin your device to the power outlet and then turn on the power button.
2. Take the Ethernet cable and join your router and extender and then your extender to your computer.
3. Now, open a default browser on your computer and enter mywifiext.net in the URL field and click enter.
4. Now, you will see the login page, where you have to enter the default login details as admin and click on the login button.
5. You will see the setup page.
6. Click on the New Extender Setup and tap YES or I AGREE when asked to accept terms and conditions.
7. Now, choose the new admin credentials and select security questions.
8. Once done, click on the Next button.
9. Click on YES when asked to use Netgear Genie to help.
10. You have to choose the radio button for SSID names and click next.
11. After that, you have to follow the instructions on the screen and complete the setup process.
Steps to change the Netgear Extender login password
It is recommended to change the login password of your Netgear extender. It is not difficult to do. You can easily do that with the steps given here.
• Open a browser and enter mywifiext.net and go to the login page.
• Enter default login credentials to login and go to the setup wizard.
• There, you have to set up a new password for your extender.
• You are all done with the process.
Netgear Wireless extender setup using WPS button
If you do not want to follow the setup process, you can easily do the Netgear wifi extender using the WPS button without making much effort. Given below are the steps to do that.
1. You have to place your extender in the same room as your router.
2. Then, plug in your device to the power outlet.
3. Wait till you see the LED light becomes green.
4. After that, press the WPS button on your extender.
5. You will see the WPS LED blinking.
6. Next, you have to press the WPS button on your router within two minutes.
7. Wait till you see the solid green LED.
8. Then, unplug your extender and place it where you want the better signals.
9. With that, you are done setting up your device using the WPS button.
Reset process of your Netgear Wi-Fi Extender
Are you getting frustrated when you are unable to fix the issues with your device with the troubleshooting steps, you can reset your device and fix the issues?
• o reset your Netgear wireless extender, you have to find the reset button on your device’s backside.
• Now, take a small paper pin and press the button and hold it for a few seconds.
• When you see the LED lights blinking, after a few seconds, release the button.
• Your device will reboot automatically and will be set to the factory default version.
• To get better performance, you have to set it up again.
Conclusion
Hopefully, this article will be a great help for you when you want to do the Netgear setup and update your device’s firmware with some simple steps. If you face any difficulty while doing the setup and login, you can easily resolve the issues with the help of the troubleshooting steps provided with the setup guide. For more queries and information, you can contact our technical experts by calling us on our toll-free number. They will be more than happy to assist you.


 3010
3010